Installation and Adjustments of the Packing of the Valve - China Topper

Installation and Adjustments of the Packing of the Valve

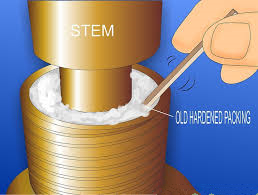
The effective sealing of pumps and valves depends on the overall condition of each component. Before installing the packing, make sure that the equipment which needs to be replaced has been effectively separated according to the site and system. This article is used to guide the maintenance personnel, engineers, and assemblers to install and adjust the packing correctly.
 
1. Tools required
When removing the old packing and replacing it with a new one, you need to use special tools as well as pre-tighten the gland nut with a fastener. In addition, it is necessary to frequently use standard safety facilities and comply with relevant safety regulations. Before installation, you must first familiarize yourself with the following equipment: checking the packing ring's cutter, testing the torque wrench or wrench, safety helmet, internal and external calipers, fastener's lubricant, reflector, vernier caliper, etc.
 
2. Cleaning and inspecting
1) Slowly loosen the gland nut of the packing box to release all residual pressure in the packing component.
2) Remove all old packing and thoroughly clean the shaft of the packing box.
3) Check whether there are corrosion, dents, scratches, or excessive wear on the shaft.
4) Check whether burrs, cracks, and wear occur on other parts, which will reduce the life of the packing.
5) Check whether the packing box has excessive clearance and the degree of eccentricity of the shaft.
6) Replace parts with great defects.
7) Check the old packing as a basis for failure analyses to find the cause of the early failure of the packing.
 
3. Measuring and recording
Record the diameter of the shaft, the hole diameter and depth of the packing box, and the distance from the bottom to the top of the packing box when the ring is sealed with water.
 
4. Choosing the packing
1) Ensure that the selected packing should meet the operating conditions required by the system and equipment.
2) According to the measurement records, calculate the cross-sectional area of the packing and the number of packing rings required.
3) Inspect the packing to ensure that it has no defects.
4) Before installation, make ensure that the equipment and packing are clean.
 
5. Preparation of the packing ring
Twining the packing
Twining the packing on a shaft of appropriate sizes, or use a calibrated cutting machine for the packing ring; according to the requirements, smoothly cut the packing into squares or at angles from 30 to 45 degrees. Cut one ring once, and use the shaft or stem to verify that whether the size is appropriate.
 
Ensure that the size of the packing ring is precisely matched with the shaft or valve stem. If necessary, cut the packing ring according to the packing manufacturer's operating instructions or requirements.
 
6. Installing the packing
Carefully install one packing ring at a time, and make each ring surrounds the shaft or valve stem. Before installing the next ring, make sure that the previous ring is completely in place in the packing box. The arrangement for the next ring should be staggered, at least 90 degrees apart, generally 120 degrees. After the last ring is installed, tighten the nut by hands and press the gland down evenly. If there is a water seal ring, check whether the distance between it and the top of the packing box is correct. At the same time, guarantee that the shaft or valve stem can be rotated freely.
 
7. Adjusting packing
Packing for pumps
(1) Continue to tighten the gland nut by hands.
(2) After opening the pump, adjust the gland nut; a little bit more leakage is allowed at this time.
(3) Slowly tighten the gland nut to gradually reduce leakage until the leakage reaches an acceptable level.
(4) If the leakage stops suddenly, unscrew the gland nut and readjust it to prevent the packing from overheating.
(5) Adjust the leakage rate until it reaches a stable state.
 
Packing for valves
Consult the packing manufacturer or the technical department in your company about the regulation or compression percentage of torque, and tighten the gland nut according to the following steps:
(1) Apply torque to the gland nut to 30% of full torque.
(2) Repeatedly open and close the valve several times, when the valve is in the closed position, apply full torque.
(3) Repeat the second step 3 or 4 times. After several hours of operation, check the adjustment status of the gland; tighten the gland till it can't be tightened if necessary.

 
Apr 16,2021
Share This Story, Choose Your Platform!

Related News